Creating Unique & Personalized Wedding Gifts Thru Etched Glass: Part Two
Yesterday, I shared how my friend Suzanne introduced me to DIY etched glass gifts with a unique twist. For a more traditional wedding gift, the bride and groom's name and wedding date are often etched into glass.
To make the gift even more special, why not incorporate elements of design from the wedding invitation? The bride and groom put in a lot of effort picking out the invite or designing it themselves, so it deserves to be commemorated and, luckily, you already know it is an embellishment they'll like!
The Wedding Invite Etched Bowl
Last year, my husband's "other sister" Kristin married Matt Scheuerer. Both are amazing people full of life and creativity. We wanted to create a slightly more traditional etched glass gift, still filled with the bride and groom's personality. When we received their lovely invites we knew instantly what we wanted to give them. The invites featured a custom drawing designed by Matt of a robot and owl sitting side by side to represent the bride and groom. The sketch represented their personalities so well; it was just meant to be!
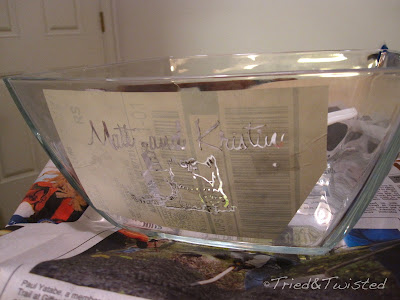
We copied the robot and owl design straight from their invite and pasted it onto a glass serving bowl to preserve their creative invite design in a way that they can use and see every day.
Custom Wedding Invite Design by Matt Scheuerer
Supplies:
Glass etching cream (we used Armour Etch)
Glass casserole dish, jar, bowl, bottle, etc.
Sticker (large enough to hold your pattern and preferably with a surface that can be written on)
Marker
Exacto or utility knife
Rubber gloves
Plastic knife or disposable brush
Find or create a pattern, text, stencil, or template. Transfer the image by sketching it in marker or printing it onto a large sticker (any kind will do). We used extra postal mailing stickers we happened to have lying around.
Apply the sticker to the flat surface of the glass object where you want the image to appear. Make sure the design is centered on the glass object and the sticker is smoothly attached with no air bubbles, wrinkles, or gaps in contact. Since our design was delicate, it was easier to attach the sticker to the glass surface first and then cut out the image. If you're worried about damaging the glass or making a mistake, you can cut out your template on a cutting board first and then attach the sticker to the glass.
Next, carefully cut out the image along the lines with an exacto knife. Peel away the cut-away areas to reveal the negative image of your design. Make sure there are no air bubbles or wrinkles near the cut-away areas, so the etching medium doesn't leak through to areas outside of the template. Now's your last chance to make any last minute adjustments to the design if an area is not as visible as you hoped. We broadened a few lines on the owl and robot that were too thin to be noticeable in this medium.
Apply the etching medium carefully with a sponge paintbrush or a plastic knife, while wearing rubber gloves and working near a sink in case you need to rinse anything in a hurry. This is not paint; this stuff contains an acid that eats away at glass, so just imagine what it can do to your skin!
Apply the etching cream nice and thick so that it's solid white. If there's any thin transparent areas or air bubbles, it may not etch evenly, so go ahead and layer it on.
Wait for the etching medium to work it's magic. The longer it sits the deeper it etches. It should be ready in 10 - 15 minutes.
Rinse the etching medium off with water which will neutralize the acid in the cream. Remember to wear rubber gloves. Once all the medium is whipped off, go ahead and remove the sticker. Goo Gone or soaking in water will help to remove the sticker if needed.
Rating of difficulty: 3 out of 5. A steady hand to wield a knife, no small measure of creativity, and a minor safety risk to your limbs makes this craft project a little higher on the scale of difficulty. However, it is still a quick and cheap project that can be done all by yourself if you don't scare off easily at the risk of sharp implements and acid. Look at you, being such a brave crafter!
Stand back and admire your one-of-a-kind gift or decoration!
Linking at:
Rain on a Tin Roof Give Me the Goods Party, Blog Stalking Thursday, Some Day Crafts, Life As We Know It By Paula, The Pin Junkie, Whipperberry, Tatertots and Jello, Natasha in Oz, Fine Craft Guild, The Dedicated House, Fluster Buster,


Great idea to use the invitation for your etching project!
ReplyDeleteI love your etched bowl.....Etching on glass always look so pretty....Thanks for sharing your process of Etched glass
ReplyDeleteThank you so much, Dany!
Delete