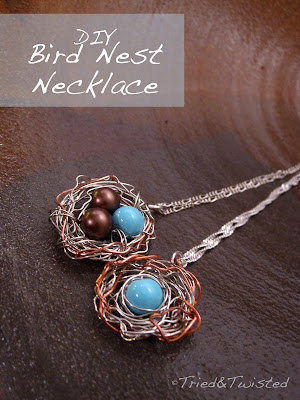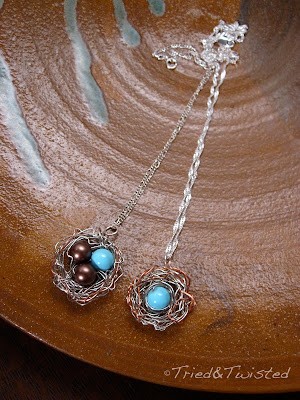
I learned this technique from the Sarah Ortega blog for my Christmas Craft & Cookie party, and all of the girls loved this DIY: so simple to make and so beautiful to wear. It's a versatile gift fit for Christmas, Valentine's Day, or Mother's Day since birthstones could easily be used for the "eggs" in the nest.
To any Crafting Studs out there -- this is a great gift idea for your lady! Jewelry is always a plus, but when you tell her you made it for her with love? Instant swoon!
Well, that's the sort of thing that would work for me anyway.
Supplies:
Jewelry wire (24 gauge)
Beads (glass, pearl, or whatever you like)
Necklace chain and clasps (available at most craft shops)
Jump ring (optional)
Jewelry crimping pliers and/or needle nose pliers
Wire cutters
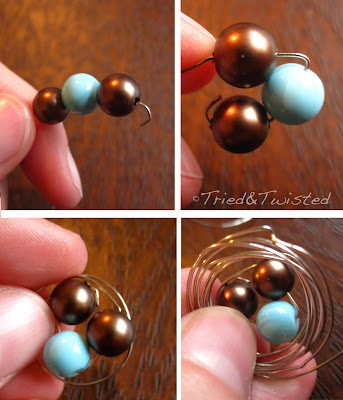
First, thread your beads through the end of the wire. Bend the end of the wire over with your pliers so that the beads cannot slip off the end. Bend the wire to place the beads in the arrangement that you want them to appear. Holding the beads in place with one hand, wrap the wire tightly around the whole cluster of beads making a big circle. Continue to loop the wire around, holding the loops tightly in place while making new loops. If you do not hold the loops in place, the wire will unravel and loosen. Repeat about a dozen times or until the bird nest reaches the thickness that you desire.
Cut the other end of the wire about 4 inches from your last loop and wrap the wire from the outside of the nest to the inside of the nest between two beads. After you have done this, the loops will not be able to unravel anymore. Repeat wrapping around on the opposite side of the nest. You can pass the wire underneath the beads to form the back of the nest.
Now for the first twist: mix up your wire material. Birds will commonly mix multiple colors of twig and thread to make their nests, so you can take advantage of the variety of wire offered at most craft stores by mixing copper and silver wire.
Slide a piece of copper wire under the wraps of wire holding the loops in place. Feed the wire through all of the wraps until the copper wire goes the whole way around the outside of the bird nest. Repeat as often as you wish. To finish it off, hook the end of the copper wire with the pliers around a section of silver wire to hold it in place.
Rating: 2 out of 5. Wrapping the wire and crimping to get your desired look may take a little practice to perfect, but even in its imperfection, each bird nest is lovely. For certain beads, you have to be careful not to scratch the finish off on the wire. Otherwise, this is a simple and easy craft which only takes a few moments to go from supplies to new jewelry!
Special thanks to Jacki at Bricklin the Bulldog for selecting the colorful beads for our party, to my fab sister-in-law Becky for providing inspiration, and to all the girls for a great crafting party!
Have you ever had a necklace handmade for you? I'd love to hear about it in the comments below. Also, I'd love to hear about your endeavors making the bird nest necklace.
Linking at: One More Time


Oooh, I love the twist on this necklace! That's so much fun! I'll have to try it that way! Thanks for the shout out, some updates are coming from this quiet blogger's end. We should have another craft day soon!
ReplyDeleteCan't wait to hear how her first show went! Another crafty party I think is a must!
DeleteThese bird nests are so pretty! Thanks for stopping by my blog and leaving a comment! ;-)
ReplyDeletewww.fabtwigs.com